Why use CO2 injection?
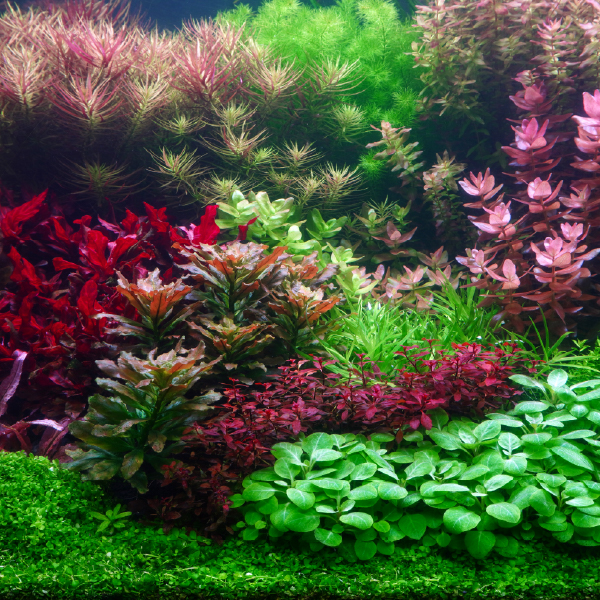
In the aquarium, plant growth is dependent on three variables: light, air and food. Light is generally provided by LED full spectrum systems while food comes from either fertilizer, substrate, or the waste of the fish themselves in the aquarium. If you are maximizing these two components and still not getting the growth you want out of your aquarium plants, adding CO2 injection to the aquarium could be beneficial.
Plants create their own energy out of sunlight, and in the aquarium, we often see the plants change form to maximize their light intake. If a plant is not getting enough light or can’t use the light they are getting effectively, you often see tall, spindly growth as the plant attempts to get the leaves with the most chlorophyll closer to the light. Adding carbon dioxide can make it easier for the plant to create its life-sustaining energy so it doesn’t need to be as close to the light itself. When the plant can grow more efficiently, we see shorter stems and smaller leaves as the plant doesn’t need to waste energy on getting closer to the light. In addition, we often see deeper reds and purples in certain plants as they attempt to block out the light, much like a person getting a tan if they get too much sun in the summer.
How to use CO2
Going from bottom to top, the parts we are going to be referencing are the cylinder, regulator, bubble counter, high-pressure air line, check valve, and diffuser. At the Ocean Floor, we specialize in the Ultum Nature Systems CO2 set up as it’s very high quality and fairly priced. For aquariums 55 gallons or less, we recommend the 24oz paintball cylinder. This is the only size that we carry prefilled and we can exchange empty bottles for a full one for a small fee.
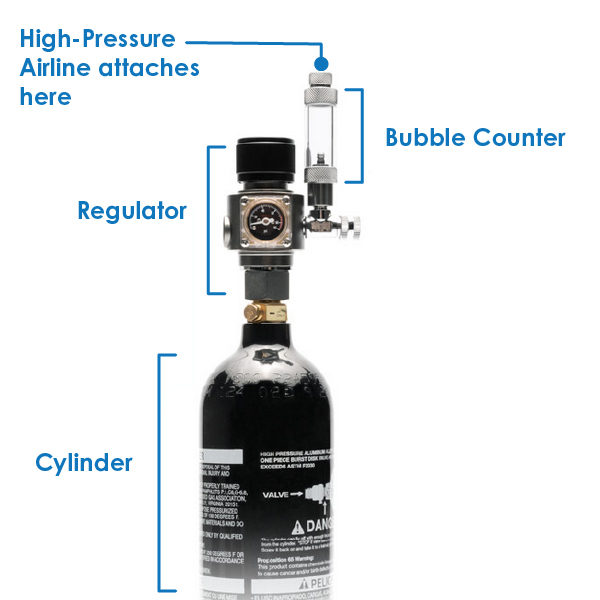
The regulator that we use is the UNS Mini. It comes with a solenoid, dual stage controllers, and bubble counter. The solenoid is a safety feature that automatically turns off the CO2 if the power goes out. This both makes sure that in the event of losing power, it won’t default to filling your aquarium with CO2 and allows you to plug the regulator into a timer so that CO2 only runs during the daytime.
The two controllers are for adjusting the amount of CO2 administered. The smaller dial is less accurate and should be opened first. The larger dial is for fine adjustments to make sure you are getting the exact amount of CO2 that you want in the aquarium.
On initial set up, leave everything in the off position until everything is connected. After installing the regulator, attach the bubble counter to the top of the regulator and fill with RODI water above the level of the nozzle. Use a short piece of high-pressure air line to attach the check valve, then a longer piece of air line to reach the diffuser. Make sure to only use air line that is rated for CO2, as the pressure and acidic nature of the gas will eat away at standard airline and can ultimately lead to equipment failure. Using a high-pressure check valve is also important because most check valves are only rated for air pumps and can’t tolerate the higher pressure output of a CO2 regulator.
For the diffuser, there are a few different options. The ideal solution is to run the diffuser inline with a canister filter or return line from a sump. Ultum Nature also makes these diffusers in three different sizes to fit different tubing sizes. This is the most efficient way to integrate the CO2 into the water and make sure you lose as little as possible to the atmosphere. To install these, you need to cut the tube going back to the aquarium from your canister filter and install the diffuser. Always put on the outflow side rather than the inflow so you don’t potentially harm your aerobic bacteria in the filter.
To diffuse in the tank for aquariums without a canister filter or sump, there are small diffusers made out of plastic or glass that are generally suction cupped to the aquarium wall. These should be placed below the outflow and as low in the aquarium as possible to allow maximum diffusion.

Once everything is connected, we can turn on the system by plugging in the solonoid, opening the valve on the cylinder completely, and turning the small dial on the regulator enough to allow gas to escape. In the long term, the benefit of the solonoid is that once this is set, it should not need constant adjustment. For now, it is time to determine the amount of CO2 necessary for the aquarium.
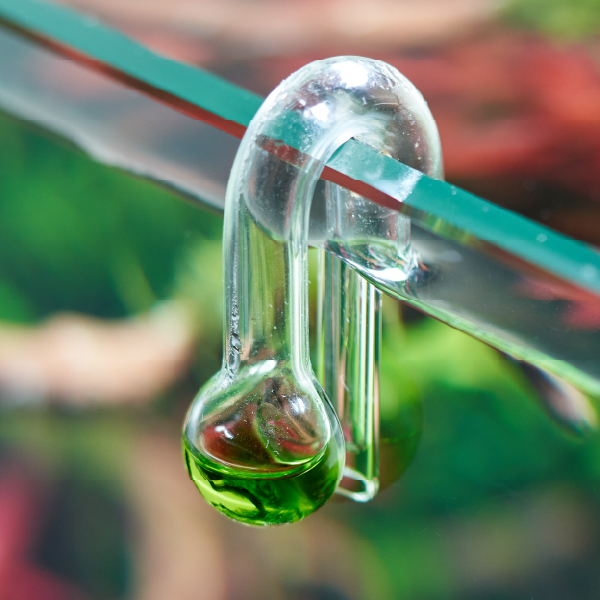
In order to determine the proper level of CO2, a drop checker can be very beneficial. These are generally going to look like a glass bulb that sits in the aquarium and constantly monitors the pH of the water. In order to install, flip upside down, fill with drop checker solution and flip back right-side up. These will either sit on the wall of the aquarium or be suction-cupped below the water line. If the solution is blue, you are not running enough CO2; if it is green the level is perfect; if it is yellow, you should turn the rate down. This is a basic instruction, and your preferred level of CO2 could be higher or lower based on the species of animal(s) you are keeping.
Once the level is stabilized using the larger dial on the regulator, count the bubbles per second coming out of the bubble counter. This is the number that you will want to continue using long term. In the future, you can remove the drop checker and just make sure that the bubble counter is running at the same rate. You can also use the bubble counter to determine when the cylinder is out of gas.
Because they can be used on many different tank sizes and with different goals in mind, the CO2 cylinder can generally last anywhere between a month and six months. When it does run out, just unscrew the regulator, put the cap back on to protect the threads, and bring back to the store to exchange for a full bottle.